HOW I CREATE MY ART

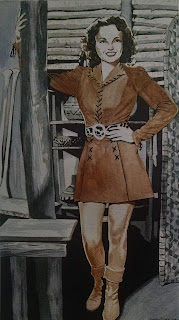
First, I lay out my images on paper using a light colored ink, preferably blue or brown. I used to sketch my images in pencil but hated having to erase my pencil lines when I was finished inking my picture. So to save time I just began painting the blocked-out scene in ink. Most of my finished work is in black & white with gradations of gray, achieved by watering down the black ink. Sometimes I'll use a single color with different values to establish a mood. This particular piece was done in full color.

The next step in my process is to paint all of the areas that are truly black. Notice in the photo that the blacks are very muddy and streaked. That will be corrected later. Doing the solid black areas helps to define the darkest, shadowy parts of the image.

Next, I begin to paint the colors. Because I work in india ink, I don't have a huge pallet of colors to choose from. As I introduce color to the image I also begin filling in the small details of the picture.

Once the picture is finished I go back over the blacks to make them a uniform, solid black. This is important as it makes the rest of the picture pop in comparison. This technique was perfected over a period of time. The first coat of black is done in Speedball brand ink, the second in Higgins ink. This would give me the desired effect that I hoped to achieve. This piece was created years ago and was titled "The Girl with the Smoldering Eyes". It sold quickly. I need to note that due to changes in the production of the inks (Speedball, I believe) that my two-step process has changed. When I discovered that my old system of Speedball / Higgins no longer worked together, I began blocking out my black areas with colored marker, and then putting Higgins on top of that. Even markers have a streaky, uneven look that demands a second going over with india ink, but the overall look is worth the extra effort.
.jpg)
.jpg)
Comments
Post a Comment